Viser opslag med etiketten modeling. Vis alle opslag

mandag den 1. marts 2010

Fighta Bommer (3)

Last Saturday we had an apocalypse battle over at my local gaming club, and thought I did not play my self, I went over there to work on the fighta bommer while watching the game. And I did get a lot of work do unfortunately I forgot my and camera so I only took a few shoots with my cell phone.


And here is the result of the days work, I am very pleased and surprised with the result of the wings.
 
Unless I run out of plastic card I should have the sheeting done today or tomorrow at the latest. 


tirsdag den 23. februar 2010

Fighta Bommer (2)


I did some more work Da Bommer this time I started on the wings.
We ad to strap a grot to da biggst pole we could find in da shop to give you tis high photo.
 
Surprisingly he did manage to take tis fine photo on his way crasing to da earth after
some of da boys thought it was funny to let go af da pole...
Ha ha ha ha ha
dad was funny

I forgot to take some shots of my ingenious wing fixing thingi (in own words), but will take some later when I get back to the workshop.

But I almost finished the rips for the left wing. Holy s*** that was tedious work, I would like to point out that someone, not mention any names here, thought it would look cool if the wing where at an angle, so all the ribs needed to be different sizes argh.... Well I did get it done and here is a shot of the power of the rainbow clamps.

Also I am not sure about the bottom part of the plane, so I think I am going to scrap that and go for some wing mounted jet engines, but more on that later.

--
Well back to the workshop
C&C is welcome

mandag den 22. februar 2010

Fighta Bommer (1)

Because when it comes to building stuff I sometimes have the attention span of a gopher ;P

You know sometimes you just have to do something else, I had one of those moments last Saturday. We have been playing a lot of apocalypse late in my local gaming club. I have always had to idea to apocalypse that it is not just a normal 40k game with more points, of course this might be solved be using special missions or narrative storytelling, but I think the way is the introduce models and armies not seen in normal games, and I don't just mean three Baneblades. It could be a funny model or some small unit that gives the over all feel to the army, and army springs to mind when it comes to special units.... DA ORKS

So yes I have started an Ork Apocalypse army Da ROAF (Da r-someting Ork Air force) mainly because this have the potential to being a fun army to play in a apocalypse game with out having 5000p+ army.

Of course I have started with the essentials Da mighty Fighta Bommer.
The main problem with construction the hull is getting the shape and structural integrity, and what I have found is a old and time tested method for hull construction, ribs and more ribs, this methode have been used for millennia for ship building and it works fine for ork aircraft building.

My plan is to construct the hull with ribs and cote them with thin .5 mm plasticcard wich is easier to bend over the curves, and the late orkify the plane with slap on armor plates and repairs.

I have going to use the same approach on the wings, with one or two beams running down the middle for support and a way to attach the wing to the hull.

Of course no fighta bommer is compleet with out an rear turret.

This simple turret is constructed from .75 mm strips of plasticcard and some styrene rods in different sizes. And of course a little vision slot on the top so the gunner can see what he is shooting at.

søndag den 14. februar 2010

Manticore (5)

I haven't had so much time this past few days to do any modelling, but I did get some done today, and here is the result.

I was thinking about raising the launcher a bit, so I made a Hydraulic piston to raise and lower the launcher.


The only problem with this is that now I have to do something with the interior so it does not just look like an empty shell.

onsdag den 10. februar 2010

Manticore (4)

Did some more work tonight, have been working on an exhaust/vent system for the rear, so the smoke from the rockets can escape.

I am not entirely happy with the framing so I am properly going to redo it to morrow, but for now it will serve as a model for what I am aiming for.


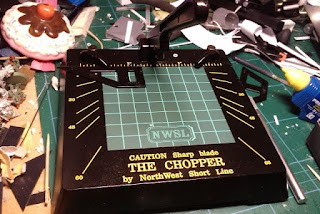
Just thought I would show you my birthday present and new favorite tool
THE CHOPPER
With this baby it is easy to cut several strip or profiles to the same length or cutting angels. I simply loves this tool. 

tirsdag den 9. februar 2010

Manticore (3)

I had the day of and when i finally got around to getting out of bed, got some more work done on the Manticore.  

Among things to mention is the hinge on the back so the tubes can be lowered into the hull, and the hatch in the front so it is possible to get the inside :P i have also been filling gaps and sanding although I am not entirely done with this. I have also test fitted the stuff at the front not sure if I'll be going with that in the end.

I still need do a lot of riveting, though I had misplace min punch pliers and was out of rivets, but it has resurfaced and I am now ready to commence riveting.


Sadly my camera ran out of batteries and my cell phone does not have a macro function so I will take some close-ups when I get some fresh batteries.

A bit in doubt about what to do with the big area on top of the tubes, it is begging for an aquilla or something like that, but dunno weather to make a large one filling the whole area or just a small one at the top.

mandag den 8. februar 2010

Manticore (2)

Did not get as much work done on the Manticore this weekend as I had hope for, but I did settle on the final design, well sort of.
 
 
--
Well back to the workshop
C&C is welcome

lørdag den 6. februar 2010

Manticore (1)

Well I have actually puled my self together and start working on a project and take some pictures of it. Some how I go the crazy idea of entering a local competition where you have to build and paint an 1700p army in 12 weeks, seeing that last time it tool me close to 3 years to get it speed painted (red 3 colours and no highlights).

So I have decided to make an Imperiel Guard army and of course I do not want to make it to easy for my self :P so it is going to be a heavily converted, atleast on the tank side of it so I got my job cut of the next couple of months.

Witch brings us back to the project on hand a manticore tank, and since I am not going to spend a lot of forgewold models and don't like the look of the stock manticore, I am going to scratch one from a chimera.

So here are the rockets I am going to use as Storm Eagle Rockets.
I am going for look more in the line of the American MLRS I heavily inspired by Changeling Chimera 438 over at The AmmoBunker. Well any how here are the beginning of the launch tubes.

--
Well back to the workshop
C&C is welcome

torsdag den 14. januar 2010

Dragons teath

Well with my exams finally over I can turn my attention to models again :P and I have a lot of ideas whirling around my head and I just have to get them out, so here is the first pieces.


I just need to add some texture and then they are ready to be moulded, yes moulded cause the my main idea was the dragon teeth in particular, but fast an easy terrain for casting, and since these pieces can easily be cast using a open mould they are ideal for the project. 

mandag den 28. december 2009

And now for something completely different...

You know sometimes you just an idea stuck in your head and just feel like you have to do make it. Well that is just what happened for me tonight, and below you can see the fruit of my detour from my current terrain project.

An imperial guard weapons locker.
Going to make some cabinets in the bottom section, and a few more details maybe some grenades or something similarly small.

And they say surfing the web for to long at a time can be dangerous :P

lørdag den 19. december 2009

Refinery table(8)

With holidays upon us I had some more the time to fiddle with my refinery table(new title... I have upgrade it from a few pieces of terrain to a whole table)

But being shot of some supplies for casting I have but the compound on hold, till I can get my hands on some more, and started on some smaller pieces for the table.

so here is a small teaser on the new pieces.
First up after seeing the picture I think it is to tall, so I am going to cut it down 10mm or so. But the big question is should it be just the 2 supports, so it is possible to draw LOS underneath the tank, or should I make it like one big block of concrete so the whole piece is blocking terrain?

BTW as some might make from the background I have to more of the small cans, so there is going to be 3 of these pieces for now.

torsdag den 10. december 2009

Refinery table ( 7)

The first half of the moulds are done, and have been prep for the other half.This is the first time I have used ordinary clay to make the "fake" half of the mould, used to use modelling clay(something like play-do), stopped using it since I experienced some problems with the silicone not hardening properly. And I must say the clay is great for the purpose, it is easy to remove from the silicon after since the clay is dissolved in water.


also most made a great mistake, nearly forgot to use the release agent on the mould, without it the silicone would fuse together and you would end up with a big lump of silicone, with some plastic in the middle.

Refinery table ( 6)

An other update tonight be for I head to bed.

I Have finished the bends and made them ready for moulding.
I used this opportunity to make an other mould, since it is not that more work to tow moulds, when you are making one. And as you can probably guess from the back ground, I am going to make a mould of some oil drums, since I am pretty sure I am going to use a lot of them in this project.

And here is the silicone rubber I am using, it is from Slymasta and is the 370 grade rubber. It is easy to work with a since it is really flexible allows for undercuts making it perfect for model replication. The keen observer might notice that there now are 3 mould, that is be cause I am not that good a estimating the amount of silicone need to make the mould, so I quickly found some other stuff I could use a mould of. It is going to be a 1 sided mould of some drums, to be used for sticking out of the ground ect.

And ps. don't say modelling isn't dangerous.
I cut my self trying to separate a drum from a old model, must have used a hole bottle of glue attaching it in the first place.

PPS.
having half you finger fixed is kinda crippling when modelling and writing.

onsdag den 9. december 2009

Refinery table ( 5)

Well just a small update for now, I have been pondering for some time now, how to make the pipe works for all my pieces as plastic tubes are hard to heat bend so it looks good. And I think I have come up with the answer.

Custom made pipe bends
I made these pipe bends using milliput, and the cut them to the correct lengths after they had hardened. And with the discs and some rivets I should with a little luck end up with something like this.
And them when I done I am going to make a silicone mould, so I can cast the in resin in the future, as is they turn out great I am going to be using a lot of them of this project.

tirsdag den 8. december 2009

Refinery table ( 4)

I have been working on detailing the tanks, so far only been working on the two tanks by the lover platform. With some monitoring consoles on each tank and a center console.

While browsing The Ammobunker earlier this day I came across a easy way to make fans or turbines, and I just had to give it a try, and here is the result. I am pretty impressed with how easy it is, the fan on the picture below is only 14mm across and it is only the second one I make so they are not that difficult. I am giong to do a guide for the fans late.
Here is a shot of the approximate position of the consoles, there is going to be running cables and pipes between to tow tank consoles and the center console.

Still not sure what I am giong to do with the other two tanks, maybe just running some pipes over to the two other tanks. And of course some danger signs on the sides, any good ideas to what is going to be in side the tank? something dangerous of course.

søndag den 6. december 2009

Refinery table ( 3)

Well I actually got some more work done today, think this is one of my most productive days ever:P
I have framed the walkways, added an other level and made a latter to access the top walkway Although it might not look like much, it certainly to along time.
I had some plastic "angle iron" from evergreen plastic, and they were just perfect to create some nice edges for the walkways, and I can see I need to order up some more, cause I am going to be using a lot of that stuff now.

fredag den 4. december 2009

Futuristic cargo container

Well I found out that making only one side of the container, might not be the write way to go. So I made half of it and planed to cast the rest, but I think i made a minor miscalculation seeing that it is like 4 times higher then a guardsman , so I am gonna make a smaller one, but at least the principal is working.

onsdag den 11. november 2009

Futuristic cargo container

Well it has been some time since my last post, but I am still alive and scratching.

My latest project is in the more small terrain pieces(fx something to place between all your cool buildings) And today's model is a futuristic cargo container, I got inspired to do the other day, seeing what I believe is some kind of generator.

So I made a model in sketch up to get an idea of how I am going to build it.


(Space marine only for comparison and not included)


I am planning to one of the sides and the cast it in resin since the container is octagonal it should work fine, and save me from a lot of work. Plus it will give me the opportunity to replicate the model, to make all kinds of cool pieces.

onsdag den 29. juli 2009

The Bastion (4)

Hmm have been quite some time since i last worked on any modeling related projects. But with my summer vacation over, it is time to get busy with the modeling again. I have had close to a month to ponder over new ideas so I am ready to get going.

I have some ideas for the walls, doing the with a angle like the tower, and I most say I am pretty satisfied with the result.


I am thinking about using some strips of plastic card to cover up to joints, making it look steel reinforced like the tower.

At first I was think about using the agies defence line bits for the parapet, but the bends will make it look weird. So I am just making them out of foam like the rest of the wall.


(space marine just for size compariosen and not included in the final product?)

I am gonna do the stone work just like the other parts of the wall, and the glue the part together, witch also means the for now i am stuck since I don't have my glue with me atm, but hopefully I will be able to get it tomorrow.